HFS or Http file server

Collapse
X
 
  • Filter
  • Time
  • Show
Clear All
new posts

    HFS or Http file server

    Topic title has been changed
    as Anshul has jump in
    and he posted different tutorial
    than i've had in my mind

    CLICK HERE TO SEE WHAT I'VE HAD IN MIND(this link will be added later !)
    16
    Yes, we do!
    93.75%
    15
    No, we dont!
    6.25%
    1

    The poll is expired.

    Last edited by metulj; 07.06.09, 09:08.
    It's better to keep your mouth shut and give the impression that you're stupid, than to open it and remove all doubt.
    ⓣⓗⓔ ⓠⓤⓘⓔⓣⓔⓡ ⓨⓞⓤ ⓑⓔ©ⓞⓜⓔ, ⓣⓗⓔ ⓜⓞⓡⓔ ⓨⓞⓤ ⓐⓡⓔ ⓐⓑⓛⓔ ⓣⓞ ⓗⓔⓐⓡ !
    ιη тнєσяу, тнє ρяα¢тι¢є ιѕ α яєѕυℓт σƒ тнє тнєσяу, вυт ιη ρяα¢тι¢є ιѕ тнє σρρσѕιтє.
    キノgんイノ刀g 4 ア乇ムc乇 ノ丂 レノズ乇 キucズノ刀g 4 √ノ尺gノ刀ノイリ!

    #2
    here is simple tutorial about it

    Step 1: Download and Run The Software

    Download the HFS or HFS or Http file server .It is free and open source and above all that its a standalone executable that requires no installation.

    * When you run HFS you might be asked whether or not allow hfs.exe to connect to Internet.Unblock it.
    * But if you have 3rd party firewall you will have to configure it accordingly.


    Step 2: Configure the port
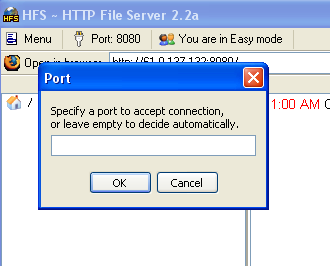
    By default HFS uses port 80.if you your firewall is blocking port 80, set HFS to some other port( for example to 8025 or which ever is free, as a precaution keep it above 1024 which is used my operating system itself.)


    * To change the port number, click on Port Number menu and enter a new one.
    * Also, if you are behind a router or firewall, you may in some rare cases, need to set up port forwarding. For all the help required for visit portfrward
    * Port-forward can help you out to set up port forwarding.There you can choose the router type and choose a program you want to set up port forwarding for, which is in our case is HFS.


    Step 3: Test HFS
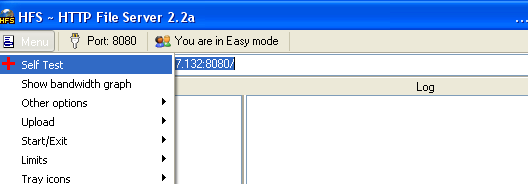
    Now you need to test your settings before you start.Click the menu in HFS and choose self test.If the test completes successfully, your settings are correct and you are ready for next step, To point your web browser to your ip address.


    Step 4: Register A domain
    For setting up a web site, you need to first assign it a domain name.Domain name are aother name for a computer ip address.For this, you will need to a DNS service running on your computer which can be mapped to particular ip address.

    * Create a Create a new user at No-IP account.
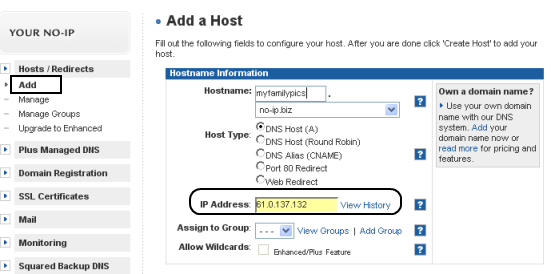
    * Login to the site with the account you created.On the left-sidebar click on “Hosts/Redirects”
    * Click on Add.In the page that opens enter domain name of your choice e.g “myfamilypics” and It will create a sub-domain on its own server that will work on your ip.


    * Your IP is recorded when you add the domain name.If you ISP is blocking port 80, you can choose a redirect given under same page.
    * Click on “Create host” and you are ready to roll.
    * Access the same from your own browser.You can add your file In HFS and access the same.


    Step 5. Install The dynamic update Client
    Skip this step if yo have a static ip.If you don’t, you will need a client software to take care of of your changing ip address.

    * Download the No-Ip.com Dynamic DNS update client software.
    * Install it and provide your login details.This program will sit in the system tray and automatically update your NoIp account when your external ip changes.


    Step 6: Launch Your Website
    You can now decide what page will appear when someone access your site, like the default page.To change the default page,

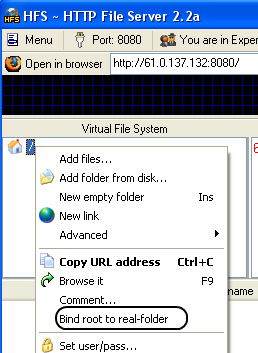
    * Open HFS and click on “You are in Easy Mode ” to turn it to advance mode.
    * Right click on little house icon on VFS and click on “Bind Root to Real Folder”.
    * Now you can add files and folder here which you want to make available in your website.
    * Next is when your site is ready send the address which you created in NO-IP or step 4 to all your friends.
    * You can even see what others are viewing in advanced mode of hfs

    Last edited by Anshul; 01.06.09, 12:45.

    Comment


      #3
      i think this tutorial is simple enough for everyone if u still had any problems write here

      Comment


        #4
        re

        Originally posted by metulj View Post
        i bet many of you, know how to do this...
        but i think many newcomers(and some others) dont know...
        so, my question is...
        are users interested to find out how fast and easy
        Apache server + PHP + MySQL + phpMyAdmin + free 'domain'
        can be set?

        it can work as real web server or as localhost or both(at same time)!
        it doesnt matter if you are on dynamic or static IP !

        ive a rough idea how to do that lol but as my ip is static id have 2 change a few things.


        Dont Ask Me Dumb Questions.Or you'l get a Dumb Answer..
        Want A Profesional Logo or Theme For Your wap site Pm Me.If I Have The Time Ill Make It For Free

        Comment


          #5
          forgot about opening up ports 80, 21, 23, 443, 3306 via routers or firewalls
          without them opened the above guide is useless

          Comment


            #6
            i have wireless internet thru another company in the town i live will this above mentioned work ill try it today after work

            Comment


              #7
              Originally posted by amylee View Post
              forgot about opening up ports 80, 21, 23, 443, 3306 via routers or firewalls
              without them opened the above guide is useless
              if you are behind a router or firewall, need to set up port forwarding. For all the help required for visit portfrward
              * Port-forward can help you out to set up port forwarding.There you can choose the router type and choose a program you want to set up port forwarding for, which is in our case is HFS.

              Comment


                #8
                As Anshul mentioned visit portforward, it realy helps u abt port forwarding.
                But I am using phpdev4 as local web server, its realy gud and just one click installation and run one file, you system will become web server with PHP+MYSQL.
                My Local web server is become now Online server, I can access it from anywhere in the world .whew. LoL

                Comment


                  #9
                  Originally posted by tariqstone View Post
                  As Anshul mentioned visit portforward, it realy helps u abt port forwarding.
                  But I am using phpdev4 as local web server, its realy gud and just one click installation and run one file, you system will become web server with PHP+MYSQL.
                  My Local web server is become now Online server, I can access it from anywhere in the world .whew. LoL
                  Apachetraid is lot better then Phpdev

                  Comment


                    #10
                    Originally posted by Anshul View Post
                    Apachetraid is lot better then Phpdev
                    I love phpdev since long time, dont say like that about phpdev, I will kill you LoL,
                    Last edited by Anshul; 10.06.09, 05:54.

                    Comment

                    Working...
                    X